Showing posts with label Hair Jewelry. Show all posts

Saturday, December 14, 2013

Kristen: 9 Homemade Civil War Christmas Gift Ideas

Perhaps the most fulfilling time of year approaches: Christmas. Nothing fills me with more joy than battling through crowds on black Friday and wrestling an old lady for a necessary Tickle-Me-Elmo. Please note the sarcastic tone I've taken thus far...

I've decided to come up with a list of gift ideas, just little things with the Civil War reenactor in mind. All of these have been featured with tutorials on my blog, so if you're new or want pictures, I've made it easy! So far, here's a list to get you started:

1. Travel bags: I have a post here that shows how to make these. It could be an afternoon project!
Cost: These can be made with leftover materials, or you could go all out! $0-$100
Time: I tend to take breaks while sewing. If you make this simple with less embellishment and use a sewing machine, this could be a 2-6 hour project.
Skill Level: Sewing intermediate. Need to know basic stitch and buttonhole.

2. Thread Waxer: It's an acorn, how can you not love it! I can show you how to make that here.
Cost: Beeswax ($10), play-dough ($1), string/soutache ($1), bead cap ($1-$3). Total about $15-$20, making dozens of them.
Time: At least 2 hours, plus wax melting time.
Skill Level: Not setting yourself on fire, patience.

3. Handkerchief: Really easy, an awesome gift for men and women, tutorial found here.
Cost: About $9 a yard here, with that making at least 3-4 hankies. Thread from stash.
Time: 2-3 hours each, depending on skill level.
Skill Level: Sewing Intermediate, hidden stitch.
****Special Note! Make your hems much smaller than I did!

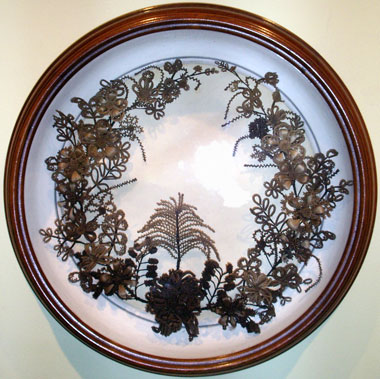
4. Hair Flower: I've tried the basic gimping technique multiple times here, here, and here. A very unique gift, especially when placed inside of a necklace. If you can make one, it will be a very unique and thoughtful gift, especially for a loved one! 
Cost: $0-$15, depending on the jewelry/frame you put it in
Time: Practice makes perfect! Anywhere from 4-8 hours. 
Skill Level: Wrapping hair around a stick. Seems easy, incredibly frustrating!

5. Housewife: I have a housewife tutorial, right here. Can be good for both men and women!
Cost: $0-20. Honestly, this cost me about $5 for scraps and all the twill tape.
Time: 2-3 hours, with generous eating time allotted.
Skill Level: Sewing Intermediate, basic and invisible stitch. 

6. Spectacle Case: Can be for males or females! Check it out here.
Cost: Leftover supplies, 1/2 yard fabric and cotton soutache. Total $3-10 with leftover supplies.
Time: 3-4 hours
Skill Level: Sewing Intermediate, whip stitch and tacking down soutache.

7. Basic "hiding" bags: A gift any reenactor will love! See it done here.
Cost: Probably free from stash-leftover fabric, any thread.
Time: 10 minutes or less. I've got it down to 3.
Skill Level: Sewing basic, or machine perfection!

8. Cooler cover: One of the best presents I ever made myself! If you need a different thing covered, just make sure to get the right measurements!
Cost: About $10 for fabric, more if using actually treated stuff.
Time: An hour or two with the sewing machine, more if by hand.
Skill Level: Sewing basic, emphasis on measuring skill!

9. Beaded Butterfly: Are you in the mood for butterflies? These things make the perfect little additions to bonnets or hair pieces. Documentation was used to support nature's colorful friends.
Cost: $5-10, beads and wire.
Time: 15-30 minutes
Skill Level: A good set of eyes and finger dexterity

Happy gift-making everyone! And if you don't feel like making anything, you can always check out my etsy shop, The Victorian Needle.

~Kristen

Thursday, June 20, 2013

Kristen: Hair Flowers

Another busy week! My etsy shop has been especially busy with orders, mostly reenactors preparing for Gettysburg. I've had to replenish my shop to keep up! Sadly that has taken time away from my hair jewelry, though I did manage to make 4 large handkerchiefs in an efficient manner.


I did find time to try a few hair flowers; while I might feel more adept at making them, I feel that they don't look any better! I've added pictures of several of my hair flowers.


 Perhaps my best improvements have been to wet the hair as I worked and to find smaller gauged wire (Currently #30, looking for #34). *Sigh*

I know that I said I would be patient throughout this process, but I started to become antsy. Practicing everyday without progress really bothers me. Until I made this flower...


My first "official" hair flower looks like a mess, but practice makes perfect! Stay tuned for my next post; I have a finished piece of hair braiding to show off!

~Kristen

Tuesday, June 18, 2013

Kristen: Hairwork Success!

Without a hint of frustration, I continued on my path to hairwork glory. Thank goodness for my patience! I am now starting to see results from my work, and it is rather satisfying.

I decided to practice braiding, which is possibly the easiest of the three techniques. First, I assembled my equipment: fake hair from Sally's, a bit of glue, the kumi-himu disk, and some thread.

Next, I followed the basic pattern from Campbell's hairwork guide. You can see me practice this with thread here. I'm glad that I spent the time practicing, because the pattern could be confusing if my fingers weren't already accustomed to the motion.


Here are a few of the problems I encountered:

1. I didn't count the strands. For most hair threads, it was okay. A few were WAY too big.
2. I need to be consistent about my level of tension at all times. Sometimes, I wasn't.
3. The hair needs to be moist. A little water on my fingers worked well.
4. Long hair is ESSENTIAL for braiding techniques.
5. Be patient; the braid takes a while to form

In less than an hour, the braid started to take shape. By the end of the hour: SUCCESS!


I know the braid isn't perfect; there were a few strands that needed to be clipped with fine scissors in the end. It was difficult with little hair pieces sticking out. By the end I was very squirmy, but satisfied. There were a few minor mistakes, but overall it looked authentic. SUCCESS!

Later I headed out to my local beading store to ask questions about attaching the hair to a finding. The woman was very helpful, and I left with the hope that my next piece could be completely functioning. Even my dog Rambo couldn't contain his excitement...


Save your hair, ladies and gents!

~Kristen

Thursday, June 13, 2013

Kristen: Upcoming sewing projects

Now that I've settled in to the new house I've been itching to start my summer sewing/crafting list. Most projects have been on hold until I could access my supplies. Perhaps a short break was a good way to recharge after the chaos of Greenfield Village!

Here are my upcoming plans for the next 2-3 weeks:

1. Work on Hair Jewelry: Dear reader, you will be VERY excited to read my next post. Let me give you a strong hint that it will be about hairwork, and a success!

2. Parasols: I have 2 to recover that are on my priority list, though I've purchased a few more online. I've already started Becky's; time to put my education to good use!


3.  Hair Pieces: I have a little stash of silk ribbon that would look adorable in my hair! I also had the pleasure of receiving extra folding instruction from Pam Yockey, who is an excellent instructor.


4.  Selling old dresses: I recently sold 3 dresses from my stock, and realized that I still have 8 left! There are at least 4 that I want to sell, though I am still working out prices. It includes the purple with black dress, the coral, and the striped cotton ball gown.

5. Dressmaking: Since I'm getting rid of a few dresses, I need to hurry up and clutter my closet again! This time I found a very pretty gold with a red design. It shall be my next work dress.


On top of my many projects, I'd like to continue my healthy routine. With a combination of (mostly) healthy eating and exercise, I've lost 10 pounds since January! Only about 10 more until my goal weight...

It's moments like these that my Grandma Dolly says I am my father's daughter. According to her, we are "movers and shakers," and we never have a still moment. Since he is currently taking full time classes at Eastern Michigan University while working and I can't even lay in bed without blogging, I'd say she's right.

To Grandma Dolly!

~Kristen

Thursday, June 6, 2013

Kristen: Victorian Hairwork Practice

Looking back at my posts, I realize that most of my posts have been about sewing or my various adventures into the past. Preparation for Greenfield Village took precedence, and my research on hair jewelry stopped. I decided to try again, this time with the knowledge that I will probably do something wrong.

Through my research and practice, I've found three main styles that I will try to produce. The skill necessary to reproduce them depends on the tools and my fingers.

Palette work


Braiding

Hair Flowers/Wreath

I've researched and tried all three with different levels of success. I decided to try braiding, and it was suggested by hairwork.com that I try a kumi-himo stand. Kumi-Himo is a Japanese braiding technique that is eerily similar to Victorian hairwork. I found a foam version of the table that is easier to carry around.


Next I installed by Art of Hairwork 1867 by Mark Campbell into my computer. The disc was completely saturated in water at one point, but it still works. The ebook is available for free here.


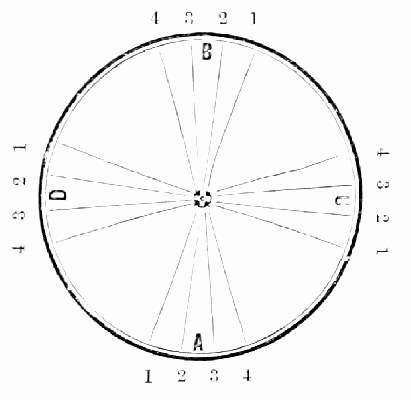
At first I followed the directions exactly for the Square Chain Braid minus the wire inside...


   TAKE sixteen strands, eighty hairs in a strand, and place on table like pattern. Commence at A, take Nos. 1, — one in each hand — lift them over the table, one on each side of the mold, and lay them between Nos. 1 at B, and bring back the Nos. 2 from B, one on each side of the mold, and lay them between Nos. 2 at A ; then go to C, lift Nos. 1 over between Nos. 1 at D, passing one strand each side of the mold, and bring back Nos. 2 from D, and lay between Nos. 2 at C. Then you are through the braid, ready to commence at A, as at first, and repeat until finished. Braid this over a mold, made of small wire, with a hole in one end like the eye of a needle, so as to draw a small cord in the place of the wire. When you have it braided, take off the weights, tie the ends fast on the wire, and push the braid tight together ; then boil in water about ten minutes, and take it out and put in an oven as hot as it will bear without burning, until quite dry ; then slip it off the wire on to the cord, sew the ends of the braid so it will not slip, and put a little shellac on the end to keep it fast. If you want it elastic, use elastic cord. To vary the size of the braid, vary the number of hairs in a strand.

Also notice I practiced with thread instead of hair. Until I have the pattern memorized, I will be working with something easier!


The first few rotations, I thought it looked funny. I discarded the directions and continued the pattern, this time going in a complete circle from A to D. The results were stunning! I have a feeling that I will be constantly disregarding the directions and just going by instinct.


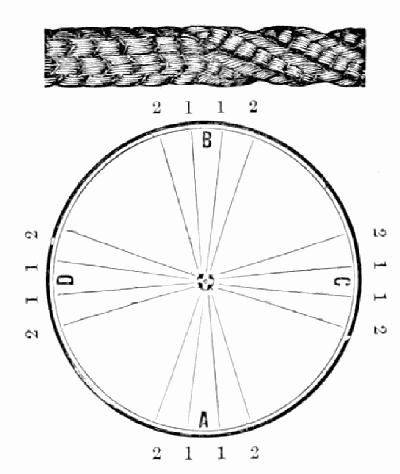
I plan to keep practicing this one braid until it is perfect! There are others challenging braids that I want to try too. Like this one:

It's going to be a long summer...thank goodness!

~Kristen

Friday, April 5, 2013

Kristen: Hair Jewelry Collection

Finally, my last post of the week! All of this writing was starting to get a little overwhelming!

Recently I have been able to study hair jewelry from a variety of sources, from how-to books to actual examples. It is my goal to be able to make simple pieces by the end of this summer. That being said, I needed a few to study!


I find most of my collection on ebay. Often a piece is broken or frayed, and it brings down the cost. To me, it just makes the hair all the more special! (Also, I feel bad for the hair like it's a person and it needs a good home)


These first two pieces I found online. I was so excited! The hair looked so nicely preserved! I then talked to Glenna Joe Cristen, and discovered that it actually wasn't hair I was looking at...it was a silk background! While I was a little sad I did not collect real hair, they are very pretty.


This little locket is confirmed hair. It's a little snippet, as if someone took it just as a reminder. Often a lock would be cut before a soldier went off to war. Is this all that remains of the love of a dedicated couple from years past??? Now comes out my morbid side...


While this bracelet is unfinished, it provides me with a useful image of the process of hairwork. As much as I read primary sources, nothing quite matches an actual piece. Also, it's kind of scratchy like straw and totally doesn't feel like hair.


And finally my favorite piece of hair jewelry! I found this one online again, and somehow won it on ebay for a very low price. While I am sad about the fraying, the detail is quite amazing. There are three different types of hair braids looped together. It bears the initials "O.M.M" Who was OMM? A devoted husband? A soldier who never returned? It's funny how sometimes I find more questions than answers when studying actual hairwork.

Also, it smells like...nice. It smells like it was kept next to flowers, which is kind of creepy.

Thus ends my week long Collections Posts. I like the idea of doing this on my school spring break when I actually have time. This means I have to collect more for next year too! *Sigh* This really does turn into an obsession...

~Kristen

ps-Don't worry, I will be posting next week on schedule too!


On My Bookshelf: December

December has been a really rough month. Between what happened in Oxford (not far from where I live...) and just the general pandemic issues,...