Most of the little loops and curls and finished in the deceptively difficult process called gimping. Before I could even begin, I had to do a little research to find some instructions. I stopped at www.hairwork.com. The first basic tutorial that pops up is for "Hair Flower Instructions." If you are at all interested, spend the $5 and they'll send you a little history and a few pages of instructions with pictures. Seriously, I recommend buying this.

Very helpful!
The instructions seem easy enough at first: "It is really nothing more than a row of hair loops wrapped over a knitting needle with wires crossed under each loop holding it fast to the needle." Alright, (I thought), simple gimping. There is no way I can mess this up!

I am of course referring to the last gimping fiasco. Thankfully no one was hurt...
I will prevail! This time I made a point of having a dry, steady hand. Now I will include basic instructions (still...buy the instruction packet...I can only do so much).

First, cut and halve your wire

Then make a little loop around the metal rod

Twist a few times

Then lay it out like this

Make a loop with the thread

Twist the wire

Repeat!

And repeat some more

It will look like this when its finished. Then pull it off...

And ta-da! A big mess of string!

That you will form into a ball to attempt to make a flower
This time though, I studied my technique and went a bit slower. I realized that I wasn't completely crossing the wire underneath the string, so it flailed around everywhere. Also, since I left string at the beginning and the end, even the smallest of tiniest of movements tugged the whole line out of place. Instead of getting frustrated, I decided to get even.

This time, cleaner loops. I also worked in the extra thread.

I was more careful pulling it off the metal.

I see (small) improvement
I knew this process would be a large undertaking, so I am content to simply let this be today's work. Back in the time when this was popular, a young lady would learn this from a family member who would pass the skill to future generations. I imagine that it took more than a few lessons to get it just right! I will try to practice at least once a day and see my progress over the next few weeks.
I must be careful to remember that I still need to complete my mourning dress! Before I blog next, I must PROMISE to myself to do the following:
1. Re-gather the bodice to make a better fit
2. Add the waistband
3. Finish creating all piping
4. Start the armscye piping
Until next time everyone! Please leave a comment, I enjoy them very much!
~Kristen


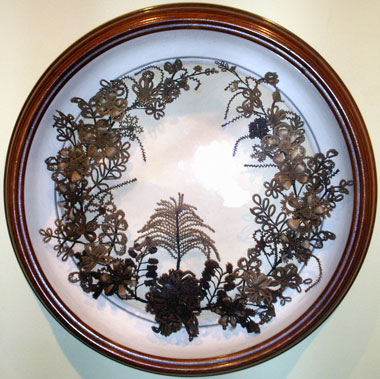
Fascinating! I've seen hair art before in museums but had no idea how one would go about making such a thing. I'd never have guessed that it was made with the help of wire.
ReplyDeleteMe too! All of this has been rather fascinating. I've also realized that the wire and thread I am using are all too thick. I can't imagine going any thicker, but apparently I must!
DeleteI see a lot of improvement! :) How interesting! I can't imagine how long it must have taken to make a whole wreath...
ReplyDelete