Sunday, March 31, 2013

Kristen: Easter Sunday

No, I did not plan on blogging.
Yes, I did it anyways.
Apparently just the thought of not having to work this week is making me restless. I have already made myself incredibly busy, so I though, why not add more?

So dear reader, forgive me. I wanted to do something about Easter. I took out all of my many books, searched my usual websites, even checked pinterest. Do you know what I found about Easter during the Civil War?

Almost nothing.

Christmas seemed to be the big holiday back then. I'm completely okay with that, since Christmas is an awesome holiday that needs to be celebrated completely. But what about Easter?! It turns out that Easter didn't really become popular until after the Civil War. Still, I had to find something! And then I did, via Elizabeth Aldridge on Facebook (thank you!). The FIDM Museum Blog is amazing, and I reccommend, that you check it out:

http://blog.fidmmuseum.org/museum/2013/03/sarah-elizabeth-crafts-easter-bonnet-1852.html

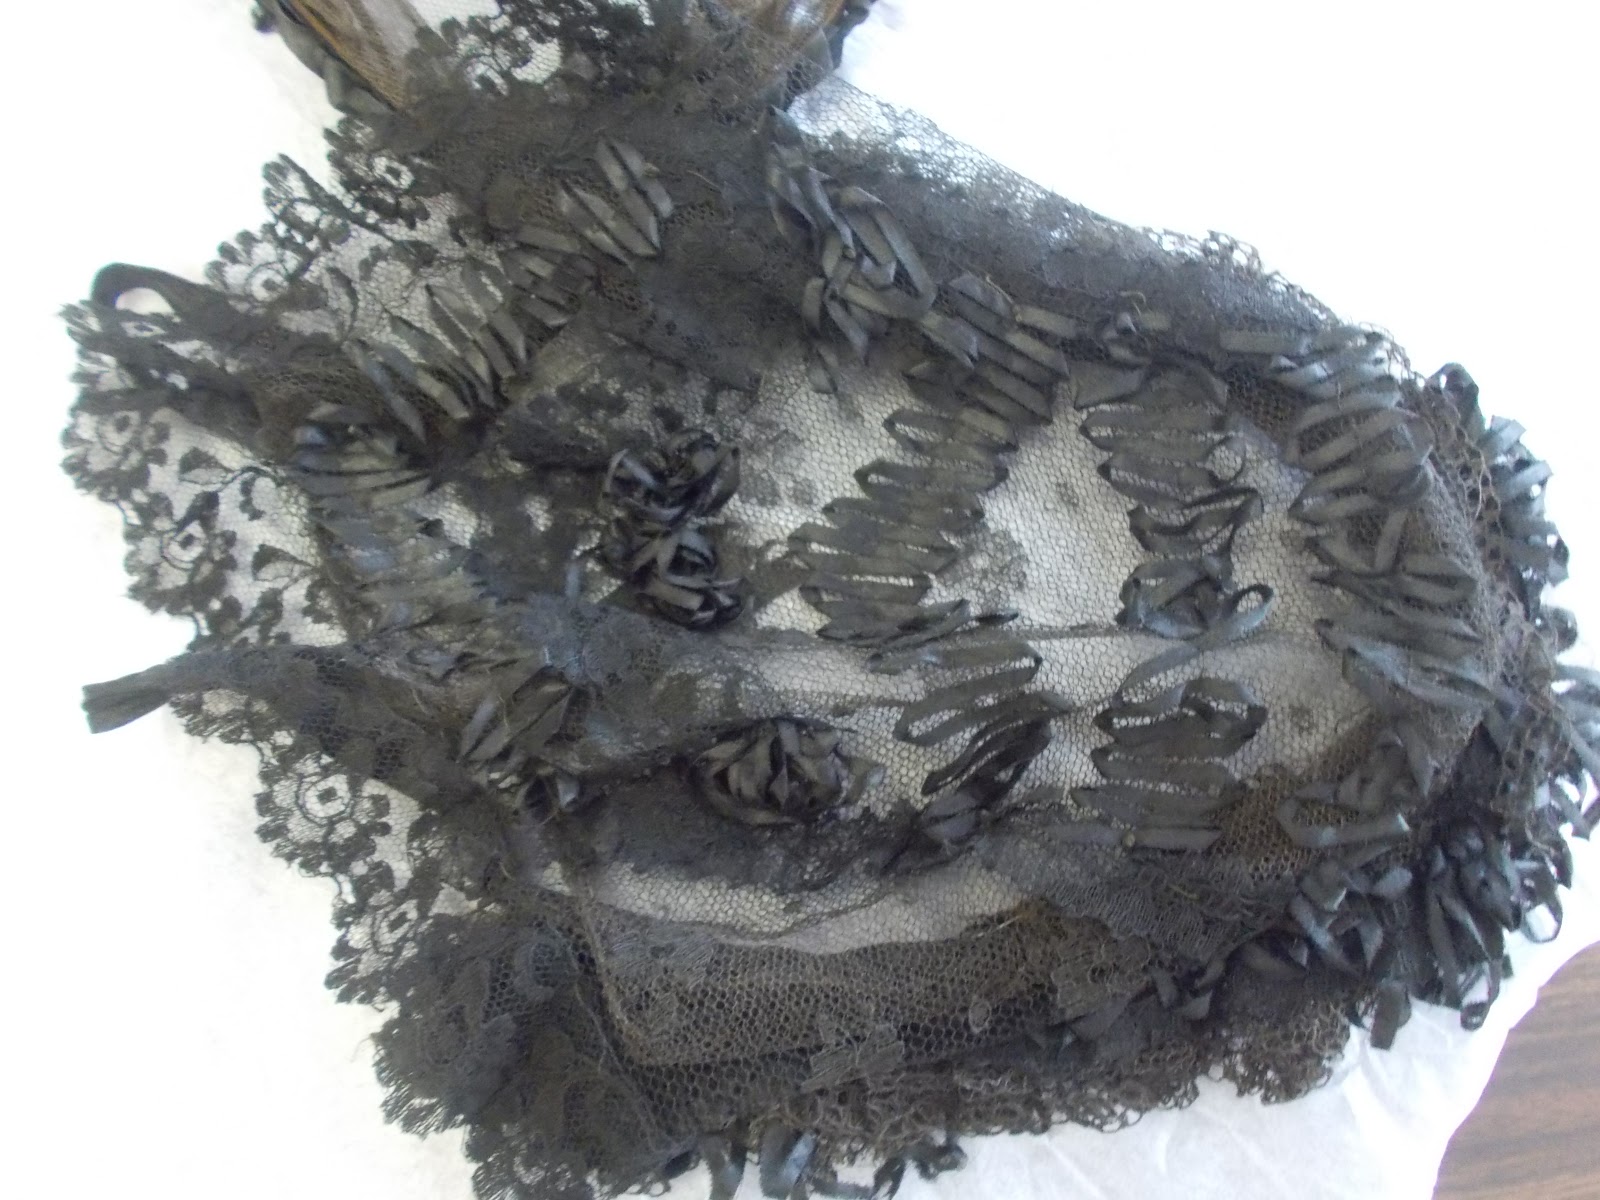
Credit FIDM Museum Library, 1852
Apparently, this bonnet was to be owned by a Ms. Sarah Elizabeth Craft. It is custom on Easter to wear something new, or you'd have bad luck for the rest of the year.

"At Easter let your clothes be new, or else be sure you will it rue." -Poor Robin

Aha! I have found an Easter tradition! And then I kept reading about Ms. Craft:

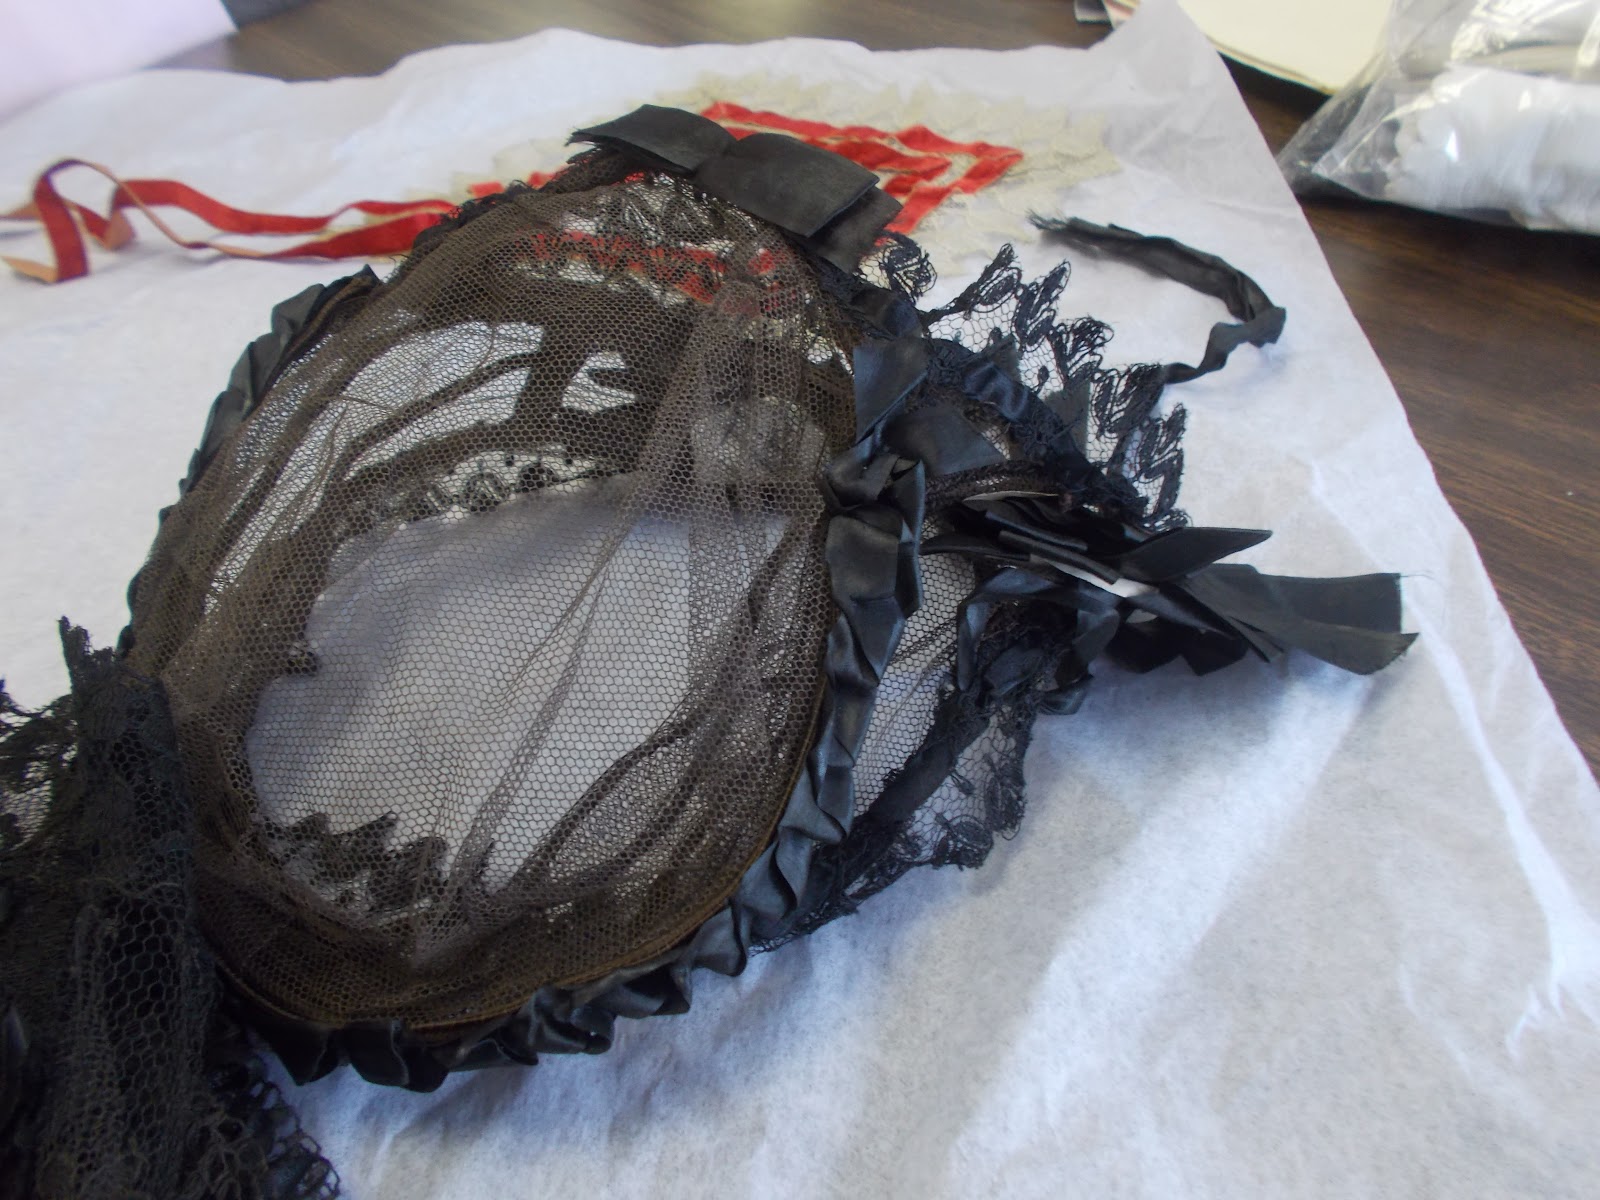
" Purchased as a Christmas present to be worn the following spring for Easter services, the gift was never opened, as Sarah died on the twentieth of December. After her death, Sarah's cherished possessions—her dolls, needlework, and letters—as well as this bonnet with its original bandbox, were packed into a small wooden trunk and placed in an attic, where they stayed until their discovery more than a century later."-FIDM Museum Library Blog, Rachel

Wow! I have found what I am looking for, but it's not what I intended. I imagine Sarah as a lively girl at 11 years old, always getting into trouble. She must have known that she would be receiving an Easter bonnet, and after her death, it was shoved away. Of course that preserved it nearly perfectly for our generation, but I can't help but being a little sad about this. She could not have known that her story would be told over a century later with the help of a bonnet she never wore.

Credit FIDM Museum blog

So with that, I leave you dear reader. Please go home and hug your children a little tighter, thank your parents for all that they do. I will be wearing a new orange shirt in honor of Sarah, and spending the day with my family.

 I will of course spill copious amounts of everything on it, but I do adore the color.

HAPPY EASTER!

This is the day the Lord has made;
Let all the earth rejoice!

~Kristen

Thursday, March 28, 2013

Guess What Came in the Mail Today!- Becky


Wool and reeds for my stay came in today!


I bought 2 yards of  Wm Booth Draper's "Light Blue Stuff", enough worsted wool for making mistakes. I also bought the closest thing to Colonial bones: reeds. I didnt know that I would get that much! Ive heard that plastic zip ties has the same effect and are cheaper, but Im a person who likes accuracy, even if this is my fist stay.
 Im happy and I cant wait to work on it!


Kristen: Day Cap Tutorial and Originals

A few weekends past I was able to attend a gathering with the 4th Michigan ladies and others. I know! I have been going to so many educational activities lately that I can hardly keep up with my posts! I know most of the ladies, and made a few friends. I love how this hobby brings together so many people! During the presentation I completed a tiny needle case for a newer young lady in the hobby. I've been dying to dig into my bright blue taffeta, and she loved it!


If I had more time, I would have embroidered a flower on the front

Lorna Mitchell-Paul of the 4th Michigan led the discussions, including a tantalizing look at a few original day caps. It was quite wonderful to sit and chat with the ladies. I even brought along my finished parasol to boost my sewing confidence use as an example. It feels nice to know that there are others who think about reenacting as often as I do! In the meantime, I snapped many pictures...


Credit K. Krewer for all originals, and her general awesomeness in the hobby

They all are made with either silk or cotton lace. The blonde lace cap is especially charming, and I did my best not to drool. Except I did drool when Lorna made lunch. Hot ham sandwiches, with a sauce that could solve all the world's problems. I ate too much, and then started my morning cap...

I didn't notice her face the first time. Now it seems kinda funny...

I decided to go with a simple lace. Since I do not have cotton or silk, I had to work with a pretty lace I found at Haberman's, along with a blue velvet and light cotton batiste fabric.

Me resist shopping? I think not...

We started by cutting the basic pattern. This is based on an original's instructions. It called for darts and a rolled hem. I later finished the cap at a lovely Sewing Party held at Sue's house, but that is for another post...


Too tired for snarky comments. But oh! Pretty!

I even found time to attach the other sleeve to my dress. Now all I have to do is attach the cuffs and do the hem. Not too bad for a Saturday afternoon, eh?

I was going for the Savior pose...

Next week is going to be very special, since it is my spring break vacation from work. I plan to write a post a day chronicling my growing antique collection. You will be able to see the manifestations of my craziness. Thanks for reading, and especially thanks to our new followers!

To do List: (These actually do help!)

1. Finish hem for mourning dress
2. Attach cuffs
3. Choose Pattern for blue cotton floral

~Kristen

Tuesday, March 26, 2013

Becky's Ffith(?)1860 Corset

So this is my... fifth Civil War corset Ive made? I swear, each time I make a new one my corsetry skills get better and better!

So story on this corset:

I was helping a friend, whom I thought was going to join the reenacing community, and began her corset. I would do one half of the corset while she did the other. We were 70% done with the corset when she had moved to a different state. Needles to say I took over. I needed it. My last corset, pictured above, was already fraying from one year.


To tell you the truth, I dont remember what type of cotton we had picked up from Joanns that day, but the material is lightweight and comfortable.


Ive used boning, boning casing and lacing from The Dress Maker's Shop. I had embroidered my last corset, but I decided against it this time, yet I made sure that there were "flossing"s on the end of each bone to make sure they stay in place.


I learned how to floss a corset and was very happy with the results.


Another difference was the hooks and eyes at the top and bottom. They are great to make sure they are closed. I also sewed a hook upside down on the front of the corset (see second/third picture) to wrap the laces around. Women did this to direct the laces away from the waist as to not have a large lace lump underneath the dress' waistline.

Becky's Spring list

There is 87 more days until summer and I have a major sewing list. Each due date is an event, but most likely well not be related to the project.

My list:
4/14-Greenfield Village opens
Yellow sheer dress
1770 cotton shift

5/03-Walker Tavern
1860 bonnet form
1770 stay

5/24-Memorial weekend
Stripped apron
1770 hips/roll

6/21-Mackinac trip (in question)/first day of summer
1770 petticoat
1770 dress

So there you have it! I hope I can do it.

Monday, March 25, 2013

10 Followers and Continuing!

Our blog has hit 10 followers!

I know that doesnt seem like a lot, but this blog was only created 3 months ago!

Look how far we've come!

I want to thank all of you for looking and liking us so much that you have followed us!

I promise that you will love our progress, our dedication in teaching, and our fall backs!

We love you greatly! 

Thank you dear followers!


Becky: How to: Double Puff Sleeves

As I've mentioned before I'm always up for a new challenge for each project I do. This is a past challenge I had most trouble with....
Double Puff Sleeves Dun-dun-dun!!!

 
I think the dresses came out great though! 

Ive found that a double puff sleeve is more difficult with sleeves rather than just the double puff sleeve itself. Ill only be showing the short sleeve construction. You could use the same directions for the long sleeve though.
To start off, we cut the lining and trace the center where you will sew in the middle creating one of the puffs. 

...and the same with the fashion fabric. Sew the lining and sleeve seam lines separate. Then do a running stitch on the bottom, the line traced in the middle, and the top of fashion fabric.

Pin the bottom lining and bottom part of the sleeve into four sections, gather the excess fabric, then sew.

Turn right side out.


Finished edges.
Then align the two middle with the tracings you used in the first step.

 
Gather and pin fashion fabric to lining following the two traced lines. *Can be tricky... was for me*

This is how I section the bottom and the top (Top view). Pin the North, South, East, and West (four corners): seam line, across the seam line and the middles of both pinned sections. Continue the "divide and concurred".

Sew the top of the sleeve with raw edges out.  

Voila! 
*To get the puffs to stay puffed, our ancestors used wool felting, but I have used *cough* polyester netting as a lining of the same size of the fashion fabric.*

Thursday, March 21, 2013

Becky: Rolled Hems

I always try to learn something new each project I do. This time I have a few "challenges".

  1. The many flounces on the skirt
  2. The double pagoda sleeve
  3. Creating an attached undersleeve
  4. Rushing at the armhole (armscye)
I am currently working on rolling the hems. The Sewing Academy and Elizabeth Stewart Clark's book shows a decent job of rolling hems, but I, for some reason, couldn't get it. 

So, onto Youtube!

This is the clip I found most helpful. The video is a little long, but that is what I need to understand the technique. 

I'm chugging along on the flounces. Mind you I have both sides of the fabric I must hem and there are 5 flounces on the dress. Along with that the flounces are GATHERED! Which means there are more than the width of the skirt! My skirts circumference is already 180 inches. Therefore, ONE flounce length is 240 inches... then multiply that by 5! Oh boy! Heaven help me!

A Tea Party?!

I want to do a historic tea party!!!

Please please please????!!!!!
Can we? Can we? Can we?

Ive always wanted to do a tea party, and in the past Ive hosted small groups (4-6) friends at my house. But thats not what Im talking about!

I want a BIG fancy tea party!

I have three places in the Southeast area of Michigan I was thinking of hosting one:
Google
The first one is The Henry Ford Estate, Dearborn, MI
I know the building itself is closed for repair, but the grounds is always open for the public! 

Flikr
The second is my personal favorite. Greenfield Village, Dearborn, MI
There are no words to describe how much I love this place. Im just so happy that it's right around the corner!

Google
The third choice (but not the only choice), is Mill Race Village, Northville, MI
Its like a mini Greenfield Village, but more personal!

Wouldn't it be grand to have men and women in fancy historical clothes of any era walking about enjoying tea, playing games on the green, and just having a grand ol' time!

Google

Google

If you're in the area and are interested for a summer tea party in MI let me know!


Wednesday, March 20, 2013

"Becky! You need to post something!" "Okay, Okay!"

Umm, so I havent posted in... forever.

So what have I been doing? 

I have been "behind scenes" working on the blog section " Get The Look" as well as keeping busy with sewing and researching. I have also been busy finding a house to move out with the boyfriend.

Im sorry that I failed to post anything.

This weekend I attended the Kalamazoo History Living Show and what an event! The atmosphere was almost as existing as a reenactment, if not more! There were eras from Early American to late Civil War. Ive been attending this event for a few years, but this year was different.

Not only did I bring my boyfriend, hoping to convince him that dressing up is fun, but I purchased nothing for my Civil War persona! 

Thats right! Im moving up! Well....maybe moving backwards. Im now working on Colonial wardrobe and my hopes are to one day work in an environment surrounded by its history; such as Fort Michilimackinac or maybe even Williamsburg, VA!

I had purchased all my patterns, looked at shoes, and bought my first silk fabric! Im not quite sure what to use the silk for, but it is the prettiest magenta/ olive green Ive ever seen!

The picture is inadequate to what it is in real life! 
Im not sure where or when my interest peaked for the colonial era, but looking at the fabulous Samantha Bullat and visiting Fort Michilimackinac in 2011 were defiantly influential!  

Kristen: Parasol Covering Workshop

I am very hungry for education. As much as I might complain about my academic studies, I am thrilled to spend any time on my "learnings" of the 19th century. Luckily I live in Michigan, home to quite a few wonderful reenactors willing to show their knowledge. Recently I was able to attend a parasol covering workshop at the Plymouth Historical Society Museum. I spent all week looking forward to it!

I found my parasol on ebay last year for about $50. The paint was chipped, and the silk was completely destroyed. I still took it out to a few events, but I knew it was time to get it recovered...

The before-ripping-it-to-shreds pic

A close-up of the round handle. So lovely!

The beautiful but tattered silk parasol
The silk lining needed to be replaced too

Let me just say now that this class was advertised for intermediate seamstresses...and never have I felt so much like a beginner! I was surrounded by many ladies I have met before in my reenacting adventures, a few even in the 21st Michigan. It was a relaxing environment!

The class was taught by Sandy Root, who I have to say is one of the most kind and patient people I've met. I had so many questions, and she was able to answer all of them! There are many sewing techniques that I've never encountered before, and she was gracious enough to help. The process took many hours, but I'm happy with my results. She even served a delicious lunch, including chili, veggies, and soda bread. I ate far more than a "proper" lady ought to, especially when they brought out the chocolate!

I laid out my skeleton

My work station was more messy than this, I promise

Sewed it right up


By the end of the day, I was able to attach the outer covering and construct the lining. There were a few bumps here and there, so I had to make plans to continue working at home. Which I did, and have now added to this post.

I did a simple gather for the trim
The silk lining was more difficult to attach
 Ta-da! It is finished and ready for its debut at Greenfield Village in May
 I feel so accomplished!

 If you ever get a chance, take a class with Sandy Root! I loved every second, especially hanging out with ladies who know their stuff. This hobby gives so many opportunities to talk to people with different experiences. In my most holy opinion, it is most fulfilling to educate others to pass on these traditions! It is also refreshing to have time to relax and create!

My next post will include my visit to a day cap workshop. Hopefully I'll have time to attach that lone sleeve to my mourning dress. Maybe even more hair gimping! Thanks for reading!

~Kristen

On My Bookshelf: December

December has been a really rough month. Between what happened in Oxford (not far from where I live...) and just the general pandemic issues,...