Looking back at my posts, I realize that most of my posts have been about sewing or my various adventures into the past. Preparation for Greenfield Village took precedence, and my research on hair jewelry stopped. I decided to try again, this time with the knowledge that I will probably do something wrong.
Through my research and practice, I've found three main styles that I will try to produce. The skill necessary to reproduce them depends on the tools and my fingers.
Palette work

Braiding

Hair Flowers/Wreath

I've researched and tried all three with different levels of success. I decided to try braiding, and it was suggested by hairwork.com that I try a kumi-himo stand. Kumi-Himo is a Japanese braiding technique that is eerily similar to Victorian hairwork. I found a foam version of the table that is easier to carry around.

Next I installed by Art of Hairwork 1867 by Mark Campbell into my computer. The disc was completely saturated in water at one point, but it still works. The ebook is available for free here.

At first I followed the directions exactly for the Square Chain Braid minus the wire inside...
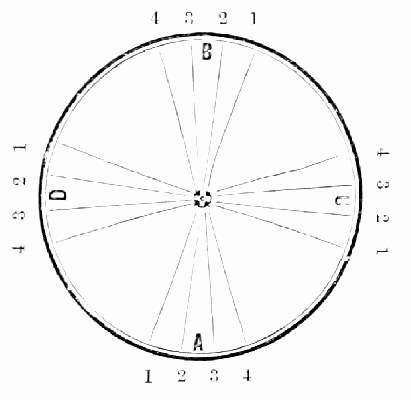
TAKE sixteen strands, eighty hairs in a strand, and place on table like pattern. Commence at A, take Nos. 1, — one in each hand — lift them over the table, one on each side of the mold, and lay them between Nos. 1 at B, and bring back the Nos. 2 from B, one on each side of the mold, and lay them between Nos. 2 at A ; then go to C, lift Nos. 1 over between Nos. 1 at D, passing one strand each side of the mold, and bring back Nos. 2 from D, and lay between Nos. 2 at C. Then you are through the braid, ready to commence at A, as at first, and repeat until finished. Braid this over a mold, made of small wire, with a hole in one end like the eye of a needle, so as to draw a small cord in the place of the wire. When you have it braided, take off the weights, tie the ends fast on the wire, and push the braid tight together ; then boil in water about ten minutes, and take it out and put in an oven as hot as it will bear without burning, until quite dry ; then slip it off the wire on to the cord, sew the ends of the braid so it will not slip, and put a little shellac on the end to keep it fast. If you want it elastic, use elastic cord. To vary the size of the braid, vary the number of hairs in a strand.
Also notice I practiced with thread instead of hair. Until I have the pattern memorized, I will be working with something easier!

The first few rotations, I thought it looked funny. I discarded the directions and continued the pattern, this time going in a complete circle from A to D. The results were stunning! I have a feeling that I will be constantly disregarding the directions and just going by instinct.


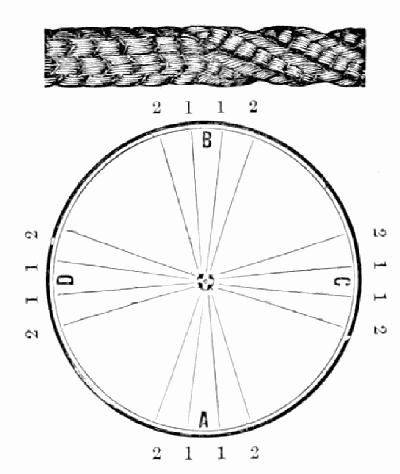
I plan to keep practicing this one braid until it is perfect! There are others challenging braids that I want to try too. Like this one:
It's going to be a long summer...thank goodness!
~Kristen


How interesting! I've always wondered how they get those braids. You couldn't get it looking so nice just by hand.
ReplyDelete-Veronica
Could I ask where you got your foam circle template? Thanks!
ReplyDelete