Showing posts with label Practice & Progress. Show all posts

Thursday, June 27, 2013

Kristen: Palette Hairwork How To

There are so many aspects of hairwork I have yet to explore! However, the one I have had the hardest time researching is palette work. Fortunately, I came across a blog here; the author attended a workshop at Leila's Hair Museum. I have wanted to go so badly! Unfortunately that is not on the agenda, but she did give me helpful hints to supplement my research.

How to treat the hair for Palette work

1. Gather your materials: glue, hair, brush, scissors, aluminum foil

2. Swipe glue onto hair liberally, making sure to keep it flat

3. Wait and let it dry (or get a blowdryer like me!)

4. Cut pieces and create!

The flower was fairly easy, but the weaving was nearly impossible. I can't help but think that I'm not using the right technique for that one...oh well, more research I suppose! Later I tried the whole process again, this time letting the glue dry completely. It was easier to work with and could be cut without flaking. 


My cutting skills need more work too. Practice makes perfect! I also have a few side projects that I am trying to finish before the Charlton Park reenactment this year in late July. Here's my running list at the moment:

1. Finish gold dress
2. Recover Felicia's parasol
3. Finish traveling bag
4. Finish another handkerchief
5. Make 1 hair ribbon

~Kristen

Thursday, June 20, 2013

Kristen: Hair Flowers

Another busy week! My etsy shop has been especially busy with orders, mostly reenactors preparing for Gettysburg. I've had to replenish my shop to keep up! Sadly that has taken time away from my hair jewelry, though I did manage to make 4 large handkerchiefs in an efficient manner.


I did find time to try a few hair flowers; while I might feel more adept at making them, I feel that they don't look any better! I've added pictures of several of my hair flowers.


 Perhaps my best improvements have been to wet the hair as I worked and to find smaller gauged wire (Currently #30, looking for #34). *Sigh*

I know that I said I would be patient throughout this process, but I started to become antsy. Practicing everyday without progress really bothers me. Until I made this flower...


My first "official" hair flower looks like a mess, but practice makes perfect! Stay tuned for my next post; I have a finished piece of hair braiding to show off!

~Kristen

Tuesday, June 18, 2013

Kristen: Hairwork Success!

Without a hint of frustration, I continued on my path to hairwork glory. Thank goodness for my patience! I am now starting to see results from my work, and it is rather satisfying.

I decided to practice braiding, which is possibly the easiest of the three techniques. First, I assembled my equipment: fake hair from Sally's, a bit of glue, the kumi-himu disk, and some thread.

Next, I followed the basic pattern from Campbell's hairwork guide. You can see me practice this with thread here. I'm glad that I spent the time practicing, because the pattern could be confusing if my fingers weren't already accustomed to the motion.


Here are a few of the problems I encountered:

1. I didn't count the strands. For most hair threads, it was okay. A few were WAY too big.
2. I need to be consistent about my level of tension at all times. Sometimes, I wasn't.
3. The hair needs to be moist. A little water on my fingers worked well.
4. Long hair is ESSENTIAL for braiding techniques.
5. Be patient; the braid takes a while to form

In less than an hour, the braid started to take shape. By the end of the hour: SUCCESS!


I know the braid isn't perfect; there were a few strands that needed to be clipped with fine scissors in the end. It was difficult with little hair pieces sticking out. By the end I was very squirmy, but satisfied. There were a few minor mistakes, but overall it looked authentic. SUCCESS!

Later I headed out to my local beading store to ask questions about attaching the hair to a finding. The woman was very helpful, and I left with the hope that my next piece could be completely functioning. Even my dog Rambo couldn't contain his excitement...


Save your hair, ladies and gents!

~Kristen

Thursday, June 6, 2013

Kristen: Victorian Hairwork Practice

Looking back at my posts, I realize that most of my posts have been about sewing or my various adventures into the past. Preparation for Greenfield Village took precedence, and my research on hair jewelry stopped. I decided to try again, this time with the knowledge that I will probably do something wrong.

Through my research and practice, I've found three main styles that I will try to produce. The skill necessary to reproduce them depends on the tools and my fingers.

Palette work


Braiding

Hair Flowers/Wreath

I've researched and tried all three with different levels of success. I decided to try braiding, and it was suggested by hairwork.com that I try a kumi-himo stand. Kumi-Himo is a Japanese braiding technique that is eerily similar to Victorian hairwork. I found a foam version of the table that is easier to carry around.


Next I installed by Art of Hairwork 1867 by Mark Campbell into my computer. The disc was completely saturated in water at one point, but it still works. The ebook is available for free here.


At first I followed the directions exactly for the Square Chain Braid minus the wire inside...
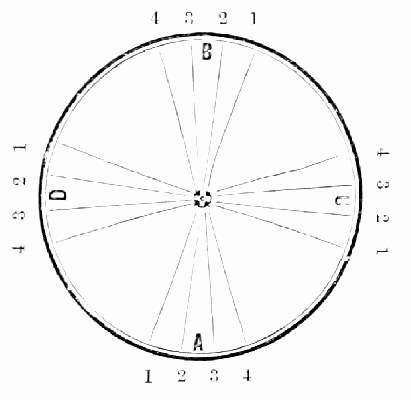


   TAKE sixteen strands, eighty hairs in a strand, and place on table like pattern. Commence at A, take Nos. 1, — one in each hand — lift them over the table, one on each side of the mold, and lay them between Nos. 1 at B, and bring back the Nos. 2 from B, one on each side of the mold, and lay them between Nos. 2 at A ; then go to C, lift Nos. 1 over between Nos. 1 at D, passing one strand each side of the mold, and bring back Nos. 2 from D, and lay between Nos. 2 at C. Then you are through the braid, ready to commence at A, as at first, and repeat until finished. Braid this over a mold, made of small wire, with a hole in one end like the eye of a needle, so as to draw a small cord in the place of the wire. When you have it braided, take off the weights, tie the ends fast on the wire, and push the braid tight together ; then boil in water about ten minutes, and take it out and put in an oven as hot as it will bear without burning, until quite dry ; then slip it off the wire on to the cord, sew the ends of the braid so it will not slip, and put a little shellac on the end to keep it fast. If you want it elastic, use elastic cord. To vary the size of the braid, vary the number of hairs in a strand.

Also notice I practiced with thread instead of hair. Until I have the pattern memorized, I will be working with something easier!


The first few rotations, I thought it looked funny. I discarded the directions and continued the pattern, this time going in a complete circle from A to D. The results were stunning! I have a feeling that I will be constantly disregarding the directions and just going by instinct.


I plan to keep practicing this one braid until it is perfect! There are others challenging braids that I want to try too. Like this one:

It's going to be a long summer...thank goodness!

~Kristen

On My Bookshelf: December

December has been a really rough month. Between what happened in Oxford (not far from where I live...) and just the general pandemic issues,...