Showing posts with label How-To. Show all posts

Monday, August 19, 2013

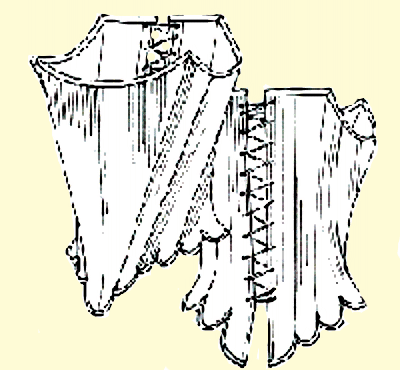
Kristen: How to make 18th Century Stays

It has finally happened ladies and gentleman. I, Kristen, have decided to branch out into different eras of reenacting! I'm not quite sure how I was bitten by the bug, but I know the only cure is more clothing! To begin I decided to work on a pair of 18th century stays via JP Ryan.

It takes me a while to start a new project. I like to study the pattern and look for other blogs that have them. There are enough that I don't even need to mention them here! Overall I'd have to say the whole process was pretty easy. I will never claim to be a master seamstress, and I will certainly always make mistakes; being kind to yourself is the best way to learn.

How to make 18th century stays
1. Buy pattern, study!
2. Cut fabric-I used 3 layers. A blue linen, a lighter interlining, and a yellow cotton lining.
3. Baste together. Here I am only showing one half of the corset. The other side is a mirror. Note that I have a certain number of pins basting the linens together. I had to remember the pieces!

4. Sew pieces together. Now I have seen a few people put in the boning first. I wanted to put it together to make sure I was doing okay!
5. Prepare for boning. I used these reeds that Wm Booth Draper carries. Make sure to file down the edges so they don't tear your fabric later!

6. Start boning! Remember how we sewed those two fabrics together? You're going to now sew those together in tiny little channels just slightly bigger than your boning material, but be careful. Too big and they wiggle around. Too small and they won't fit!

7. I was lucky that my boning channels were the exact size of my sewing machine foot. I did not have an exact formula for the boning; I just looked for spots that needed support. When I cut the tabs, I tried to have at least 3 channels each. Also remember to have boning between the eyelets when it is laced together.
8. Trim boning where needed and sew shut. Attach your lining to the inside.

9. Finally, add eyelets and white cotton twill tape. on the edges. The eyelets have a pattern.

Finally, I could try it on! At least 4 yards of lacing is needed.

I certainly made mistakes during this process, but I am very happy it is finished. Many people will be afraid to cut into precious fabric or start a "difficult" project. Personally, I'd rather mess up and learn than to wait until I build up the courage! The whole thing only took a few days total.

Here is just a reminder-ladies, if you have the time and the opportunity, buy/make the undergarments! A period outfit is not complete without the proper undergarments! Don't ruin your hard work with the wrong silhouette. I think I'm beginning to fall in love with this whole cone shape thing anyway.

Thanks for reading! I have so many wonderful things coming up soon!

~Kristen

Friday, August 9, 2013

Kristen: Civil War Wrapper

While I might not have mentioned it here, during the Charlton Park reenactment I borrowed Becky's wrapper. I liked it, very very much. So in a blind fit of raging jealousy, I made my own.

I used the Laughing Moon #118, which you can order here through their website. I then searched through as many originals, looking for the colors that seemed "right." I really wanted red and blue with some sort of paisley, and I almost gave up until I found this:

Yes, I believe that Barbara Brackman is a genius of textiles. I have loved every single thing she has posted, and would gladly empty my wallet for a few more dress lengths. So far, I ordered 3 yards for $10.75 each, and did not use all of it. Then I purchased 7 yards of a plain blue cotton brocade, pre-washing everything. When I opened the pattern, I thought the hard part of this was over. Guess again.

While the picture is a bit fuzzy, it can't mask the fact that these "instructions" took up half of the floor! I was immediately overwhelmed and did something else for an hour. When I returned, I was prepared for battle. I pored over what appeared to be complicated drawings, and in reality, there are just a million ways to position the pattern pieces for cutting. I cut the pieces a bit larger, and figured it would fit together a bit like this:
At this point I stopped paying as close attention to the directions and started with instinct. Here was my main process.

1. Wash everything (this might seem like a "duh," but at one time I didn't do this)

2. Cut pieces (I only lined the back bodice to keep it light)

3. Make piping for armscye, neckline, and cuff.

4. Roll in bodice at waisteline.

5. Gauge skirt then attach to bodice.
6. Treat Bodice/skirt as one piece, attach side fronts to both sides (Open armscye more).

7. Attach piping.

8. Attach sleeves.

9. Put on contrasting print (I just put it over the blue, with a slight gap)
10. Voila! Dress

I made Stephanie model it for me at our Port Sanilac event. I wore it for a bit, but was nervous about the mud. Note the pretty little belt! I made that by folding over extra blue fabric and stitching a section of the paisley that I liked. It really popped!

As for my recommendations for this pattern (that worked for me):
1. Open up armscye. I like my things comfortable.
2. Raise waist a bit. It's a little long. 
3. Take a little off the total circumference of the hem (at the front piece).

So there you have it! After wearing my wrapper, I'm totally wondering why it took me so long to make one. The total time on this project was about 4 days, the cost about $40 + the pattern. If you're going to do this, totally buy the pattern. It worked for me.

Has anyone else tried this pattern? Did you need to make modifications? Do you like the colors I picked?

~Kristen

Thursday, June 27, 2013

Kristen: Palette Hairwork How To

There are so many aspects of hairwork I have yet to explore! However, the one I have had the hardest time researching is palette work. Fortunately, I came across a blog here; the author attended a workshop at Leila's Hair Museum. I have wanted to go so badly! Unfortunately that is not on the agenda, but she did give me helpful hints to supplement my research.

How to treat the hair for Palette work

1. Gather your materials: glue, hair, brush, scissors, aluminum foil

2. Swipe glue onto hair liberally, making sure to keep it flat

3. Wait and let it dry (or get a blowdryer like me!)

4. Cut pieces and create!

The flower was fairly easy, but the weaving was nearly impossible. I can't help but think that I'm not using the right technique for that one...oh well, more research I suppose! Later I tried the whole process again, this time letting the glue dry completely. It was easier to work with and could be cut without flaking. 


My cutting skills need more work too. Practice makes perfect! I also have a few side projects that I am trying to finish before the Charlton Park reenactment this year in late July. Here's my running list at the moment:

1. Finish gold dress
2. Recover Felicia's parasol
3. Finish traveling bag
4. Finish another handkerchief
5. Make 1 hair ribbon

~Kristen

On My Bookshelf: December

December has been a really rough month. Between what happened in Oxford (not far from where I live...) and just the general pandemic issues,...