Showing posts with label Underpinnings. Show all posts

Monday, August 19, 2013

Kristen: How to make 18th Century Stays

It has finally happened ladies and gentleman. I, Kristen, have decided to branch out into different eras of reenacting! I'm not quite sure how I was bitten by the bug, but I know the only cure is more clothing! To begin I decided to work on a pair of 18th century stays via JP Ryan.

It takes me a while to start a new project. I like to study the pattern and look for other blogs that have them. There are enough that I don't even need to mention them here! Overall I'd have to say the whole process was pretty easy. I will never claim to be a master seamstress, and I will certainly always make mistakes; being kind to yourself is the best way to learn.

How to make 18th century stays
1. Buy pattern, study!
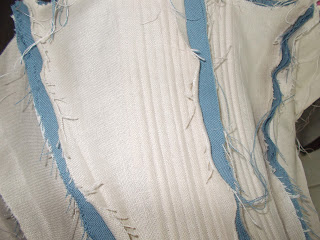
2. Cut fabric-I used 3 layers. A blue linen, a lighter interlining, and a yellow cotton lining.
3. Baste together. Here I am only showing one half of the corset. The other side is a mirror. Note that I have a certain number of pins basting the linens together. I had to remember the pieces!

4. Sew pieces together. Now I have seen a few people put in the boning first. I wanted to put it together to make sure I was doing okay!
5. Prepare for boning. I used these reeds that Wm Booth Draper carries. Make sure to file down the edges so they don't tear your fabric later!

6. Start boning! Remember how we sewed those two fabrics together? You're going to now sew those together in tiny little channels just slightly bigger than your boning material, but be careful. Too big and they wiggle around. Too small and they won't fit!

7. I was lucky that my boning channels were the exact size of my sewing machine foot. I did not have an exact formula for the boning; I just looked for spots that needed support. When I cut the tabs, I tried to have at least 3 channels each. Also remember to have boning between the eyelets when it is laced together.
8. Trim boning where needed and sew shut. Attach your lining to the inside.

9. Finally, add eyelets and white cotton twill tape. on the edges. The eyelets have a pattern.

Finally, I could try it on! At least 4 yards of lacing is needed.

I certainly made mistakes during this process, but I am very happy it is finished. Many people will be afraid to cut into precious fabric or start a "difficult" project. Personally, I'd rather mess up and learn than to wait until I build up the courage! The whole thing only took a few days total.

Here is just a reminder-ladies, if you have the time and the opportunity, buy/make the undergarments! A period outfit is not complete without the proper undergarments! Don't ruin your hard work with the wrong silhouette. I think I'm beginning to fall in love with this whole cone shape thing anyway.

Thanks for reading! I have so many wonderful things coming up soon!

~Kristen

Monday, June 3, 2013

Becky: GFV Prep and Greenfield Village Memorial Weekend

Ugh! Im such a bad blogger! Im sorry its taken me a WEEK to talk about Memorial Weekend. I caught up with a few families from that weekend, with larger family members, and they said that Sunday was the last day of taking care of the 'Memorial After Math'.

Yesterday, my boyfriend (of 7 months!) and I enjoyed a beautiful day at the Detroit Zoo. Because he is the owner of a business, he is often not available, or gets home really late. Im happy that the day went really well and we have became even closer because of this trip! Unfortunately this was the ONLY picture taken of that day:
Andy and I at the Arctic Circle, Detroit Zoo  
And for the long waited post:
May 24, '13, Friday 
It was confusing day for all of us. My boyfriend had the trailer at his shop, yet he worked in the morning, so I didnt know when he would be picking my brother and I up. Sue was at home waiting for her house sitter and Sophika to arrive. I wanted to arrive early, say, 2pm before most people arriving at 3. FYI, the gate opens at 5pm.

Sue txt me: "Where on our way!"

Oh crap! I had JUST finished packing my clothing and the night before I had made Switchel. I swear, Andy, had better remember bringing the frozen drinks!

"Where in line now!-Sue"

Great! It takes Sue an hour to get to my house. Its been an hour since she last talked to me. WHERE was Andy?!

"Andy still hasnt arrived"
"Where are you?"
"Home"

Wait. On second thought, I know Sue. She's the nice one that will drop everything for one person. I txt her right after:
"Stay there. Its first come, first serve. Snatch us the spot when you can."

"Ok"

I heard the diesel truck down the street. "Oh finally!" I think. I looked at the clock 5 o'clock! Really?! We're late!

"One more stop babe." Andy told me. Something I really didnt want to hear.

After picking up more Gatorade, we where on our way.

We pulled up and there was the line! Oh Good! We didnt miss a thing!

We had found the perfect spot near the silk tress. My brother and I had camped there last and Drew quickly snatched it up!

We had a wonderful group of friends help us set the "house" up. We had set up in record time! Our family would take hours to set the house up, but with the extra help, we split the time in half!

May 25, '13 Saturday
Saturday was pleasant. The weather was cool, but it never reached to a point where I had to wear a jacket, nor cool down with iced drinks.

Saturday was my brother's 18th birthday and I decided to wear my dinner dress for the whole day in celebration. Normally I would only wear this dress after 5pm for a dinner party, but I thought I wouldnt need to change for the fashion show that afternoon.

I FINALLY met Veronica and her awesome mom! I was very happy to see them! It was really great to finally to have met them, but also to talk living history with them!

I was often seen sewing that day: 
I was determined to get the sheer dress at least presentable for the weekend. I had come to terms with myself. I could make the dress presentable, but I would not have the dress finished like the original I was replicating. I still need to work on the ruffles and to gather the sleeves.

I had grabbed a new member of the 21st to escort me to the fashion show.  He looked fabulous from the first day he joined the group and I knew that Beth needed more people for the fashion show. It was a win-win!


This dress is also a replication form an original. I had this fabric for years, and only last year I found an original, in the book: Masterpieces of Womans costume of the 18th and 19th century, to reproduce it. It has a predominant square neckline suitable for fancier occasions like a dinner or a small celebration and would often be worn AFTER 5pm. The short sleeves are often another sign that it is a dinner dress. Although the dress SHOULD be made out of silk, it is not, yet the rosettes and covered buttons are. To top it off I added pockets! I love them and use them often.

May 27, '13 Sunday

R to L: Me, Sue, Sophika in our fabulous wrappers
I was happy to have Dad join us Sunday morning at breakfast. His plane arrive the night before from Los Vegas for work. It was different not having Dad set up, but it was good to have him for the weekend.


Sophika offered to cook for us that weekend.

"I have the NEED to FEED!" She would say.

I never went hungry that weekend!

There was another fashion show that day and I finished the dress in time!
I had Jacob escort me again.

Kris showed off her new impression too!

After the fashion show, the ones who could go went to the Eagle Tavern. Here is only a fraction of the members in our group!

 Later that night the ball that everyone has been waiting for was held at Lovette Hall. I had recently sold off the dress I was planning to wear, and the one that I brought was borrowed from a friend that forgot hers. I didnt mind that I didnt go to the ball. My boyfriend was wearing modern clothing, we didnt have time to make him a set. Instead of the ball, we joined those who didnt go, around a campfire.

Dad and Step-mom-to-be

Sophika looking gorgeous in blue.
May 28, '13 Monday
Monday wasnt such a pleasant as the others. For the sake of Jake, it rained the last part of the day. It was horrible to tear down the tent. The tents were wet, you were wet, and everyone wanted to go home. Because of the rain, I was not able to show Andy, my boyfriend, the activities going on. I hope to show him more than just our tent at Jacksn in August.

That morning however, there was a wonderful Memorial service in front of the town hall. The announcer asked for all that have served and it was awesome to see how many have severed for this great country!
 
Besides the rain and the week after, unpacking and drying the tents. I would say that this event was a success!
Monday, April 29, 2013

How to Get the Middle Victorian Look: Dressing to the Nines Part 2- Becky

Have you picked out an experienced seamstress? Or have you embarked on the challenging road of making a corset? Either way, you are on your way to get the perfect silhouette!


The under petticoat or modesty skirt was a slip to cover the wearers backside and could be used from the un-tucked material of the chemiseWith a hoop, men and others would be able to literally "see up the skirt" of the woman who did not wear an under petticoat. 
Under petticoats were made of cotton and other like materials. They were also made of red flannel to "prevent rheumatism" in the winter and colored wool for the hard work at the farm!
There is no need for pattern for an under or over petticoat. Under petticoats are comfortable with a 90 inch circumference. You can accomplish this with fabric 45" wide. You would need to measure the length you desire and cut three panels. Gather the top to a waistband that fits your measurement and hem! This is also do-able with larger width fabrics.  


The hoop and or cage is what makes the shape of a Victorian woman. In 1830's women would pile on under petticoat after petticoat to make the desired bell shapes. Then the late '40's and '50's women were wearing the hoops. There are many shapes and widths a hoop could be. 


Ok un minuto.... I just googled searched "Civil War Cage"... This is what I got:
HAHAH!

You can decide on a hoop by your height and body type. Here are some CDVs that show different hoops and cages: 


1860's original cage
The Laced Angel's repro
A cage is a skirt support that has no fabric between the boning, but a hoop has the fabric. My cages, shown below, is made from 7 bones and vertical twill tape connected to a waistband. I bought this from Kay Gnagey at her Originals By Kay store. I ware a cage of 108 circumference and think it is a good size for me. I would also look good in a 90 circumference too. I would be able to layer on over petticoats on this cage if I wanted to make the skirt fuller.


The over petticoat is created with the same formula as the under petticoat, but you want to make sure that it fits over your hoop! The purpose of an over petticoat is not so much as modesty, but to make the skirt wider and to hide the bones. 


Some times Im a derp and look derpy like this:  but this is a great example how the bones show through the dress. I do have a petticoat on, but only one. A great way to prevent this could be to have multiple petticoats or to have a petticoat with tiers. Buy the way, Ken said something really funny and the wind was blowing hard. 

The dress is the last garment you put on to "dress to the nines". I once read a book which was published in 1863, that listed 7 types of dresses! A practical woman would not have so many dresses. One dress may have been and 1)everyday dress, 2) Sunday dress for church, and 3) an evening dress for dinner parties or balls!
But think of the type of woman you are portraying. Are you an immigrant farmer that came over with what she  had on her back? Are you married to a wealthy business man? Different personas will determine what fabrics, prints, styles you will be wearing!

My favorite "go-to" impression is more fact than fiction! I portray a German farmer and I only have one dress. I wear the "required" underpinnings such as: 1) Chemise, 2) drawers, 3) socks, 4) shoes, 5) underpetticoat, 6) a corded petticoat (an underpetticoat with string sewn into the skirt to make a "fuller" look), 7) and my dress!

I know the watch and necklace should not be in the picture!
My dad portrays a poultry farmer. He really does sell eggs to the other reenactors at events! If you are camping a MI event and forgot eggs, you're covered! 
 

Thursday, April 25, 2013

How to Get the Middle Victorian Look: Dressing to the Nines Part 1- Becky

I have posted this "Get the Look link" when I was organizing the blog some time ago. You can get my suggested patterns on the link, but I will only be concentrating on the clothing line up.

And so, now you have trained your eye and saw large and small differences an era can have. You might even see similarities between fashion from 70 years a part! Aspects of fashion were reused and thought of as "new", but in reality, it was used back then too!


Now lets move to your clothing line up: Dressing to the nines!

Ever wonder what "the nines" meant? I searched for the classic saying's origin and found this:
"The first example of the use of the phrase that I can find in print is in Samuel Fallows' The Progressive Dictionary of the English Language, 1835. In his entry for the phrase 'to the nines' Fallows gives the example 'dressed up to the nines'..."

How appropriate!

It was how many layers a woman would wear in the Victorian Era..
.. Lets look!
  1. Chemise
  2. Socks
  3. Shoes
  4. Drawers
  5. Corset
  6. Under petticoat
  7. Hoop (or skirt supports)
  8. Over petticoat
  9. Dress
Brooke showing off her new chemise.
Lets start off with what you wear first! The Chemise is a loose, shirt like undergarment, that protects the skin from possible pinching from lacing the corset and it absorbs sweat, protecting the dress. They also maybe tucked into the drawers or "loose" and used as a modest petticoat (underpetticoat) at its appropriate length near the knee. Chemises were made of cotton, muslin, linen, and pima cotton.


Socks are self explanatory. Socks could be as short as mid calf to over the knee. You could wear plain, plaid, or clocked socks shown below.
Found at Jas Townsend & Sons
Remember when I mentioned that I wear all the appropriate underpinnings? But of course I do! Drawers were introduced near the 1830, but before then women had no type of underwear. The reason for this was that women didnt need them. The purpose of underwear is to protect the clothing from natural body oils and fashion before 1830 were of loose skirts. Drawers became more essential to wear as the clothing became closer to the skin. However, during the time of the month, women would tuck, and use the drawers as extra protection.

The interesting thing about drawers are the fact they do not have a crotch. They are split! I see many new reenactors who are very modest and would not touch split drawers for that reason. But you would wear a underpetticoat to cover up! I find that split drawers are VERY useful when "visiting the lollielocks". I couldnt imagine fussing with the layers between under the petticoat, above the corset and then to put the drawers back in place. It is defiantly a time saver! Drawers were also made of cotton, muslin, linen, and pima cotton.


Believe it or not, shoes, are the next thing you put on! Once you put on your corset, you will not be able to touch your toes easily. I have done this more than I would like to admit! Fugawee and Robert Land are my personal favorite and they have also been compared in a VERY long list of forums. You can find decent black shoes at thrift stores too! I advise saving up for the wonderful, comfortable shoes of Robert Land or Fugawee.
Fugawee
Robert Land  

I cannot stress how much a corset is essential to getting the right look! It is more important than a hoop or a dress! A corset forms the body to the shape of 1860 and supports all of the petticoats and hoops! Can you imagine your hips carrying all the weight of the skirts and dresses? Their called "skirt supports" for a reason! Don't be discouraged about the price of a well fitted corset or the many parts to make one. Save your money for an experienced historical corset maker, or take your time making one. If they are fitted well, they are more comfortable than a bra! 

Samantha
Here are three wonderful examples of a well fitted corset on  ANY body shape!
Myself, Becky
Katie


If you wish, take some time looking at these wonderful corset makers as I take a break from your clothing line up!

All women do custom corsets.

Saturday, April 6, 2013

Becky: Undies All Around!

After getting the fabric in the mail, I decided to make the shift. In a few hours I had a shift made. I used the Regency Underpinnings from Sense and Sensibility.

Shifts did not change greatly between the years and I find it comforting that I could use a garment for more than one era.

My shift (and Chemises) are made out of 100% cotton, but in colonial/regency America, shifts were primarily linen.
My freshly pressed shift...and my toes!
So I was about to work on my other projects when My boyfriend came up to me and said he wanted to join! Well no, that didnt happen. I actually told him that my family's rule was only visitors in garb are allowed to visit under the fly on event weekends. I kinda told him he had to wear something to see me this summer. *Snicker*

So I began, with the extra fabric, to make him undies too! My guy is a big boy but he loves BIG too! Unfortunately his measurements exceed all of my patterns. Humph! Well, Ill make the clothes anyways. He can always grown into them.

Boyfriends drawers.

Im excited to bring him along! And not to mention, making his outfit!

On My Bookshelf: December

December has been a really rough month. Between what happened in Oxford (not far from where I live...) and just the general pandemic issues,...