It takes me a while to start a new project. I like to study the pattern and look for other blogs that have them. There are enough that I don't even need to mention them here! Overall I'd have to say the whole process was pretty easy. I will never claim to be a master seamstress, and I will certainly always make mistakes; being kind to yourself is the best way to learn.
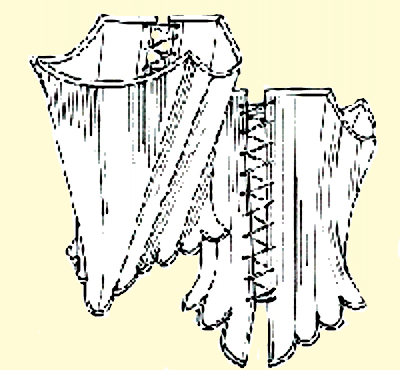
How to make 18th century stays
1. Buy pattern, study!
2. Cut fabric-I used 3 layers. A blue linen, a lighter interlining, and a yellow cotton lining.
3. Baste together. Here I am only showing one half of the corset. The other side is a mirror. Note that I have a certain number of pins basting the linens together. I had to remember the pieces!

4. Sew pieces together. Now I have seen a few people put in the boning first. I wanted to put it together to make sure I was doing okay!

5. Prepare for boning. I used these reeds that Wm Booth Draper carries. Make sure to file down the edges so they don't tear your fabric later!

6. Start boning! Remember how we sewed those two fabrics together? You're going to now sew those together in tiny little channels just slightly bigger than your boning material, but be careful. Too big and they wiggle around. Too small and they won't fit!

7. I was lucky that my boning channels were the exact size of my sewing machine foot. I did not have an exact formula for the boning; I just looked for spots that needed support. When I cut the tabs, I tried to have at least 3 channels each. Also remember to have boning between the eyelets when it is laced together.


8. Trim boning where needed and sew shut. Attach your lining to the inside.

9. Finally, add eyelets and white cotton twill tape. on the edges. The eyelets have a pattern.

Finally, I could try it on! At least 4 yards of lacing is needed.


Here is just a reminder-ladies, if you have the time and the opportunity, buy/make the undergarments! A period outfit is not complete without the proper undergarments! Don't ruin your hard work with the wrong silhouette. I think I'm beginning to fall in love with this whole cone shape thing anyway.
Thanks for reading! I have so many wonderful things coming up soon!
~Kristen


My daughter, age 17, has been an 18th century re-enactor for years and has reached the age where she really needs stays. She has been planning to make her own, and I know this information will help - especially the photos. Thanks!
ReplyDeleteMy daughter may prefer to make a half-boned stay rather than the fully boned version you have here, as she is a small person who needs to have the breath control to sing and play her penny whistle while in costume. Any thoughts or comments on the differences?
ReplyDeleteI had the same concern when buying the pattern that Kris has used, which she later bought from me. I chose the full bone for support. I love the way my civil war corset feels and wanted something similar to that, although my civil war corset is not fully boned. Another reason to buy the fully bone was the shape that it would create. Look at which dress you plan to use over it. Like corsets, a different style will change the look of the dress. Lastly, but more importantly I bought the full bone because it was more common and accurate than the half boned. How accurate does she want to be? And remember the stays are not suppose to constrict, but to support and women back then did use wind instruments too, and they were wearing stays!
DeleteThey look great! I just made a pair of 18th century stays myself but with the shoulder straps. Seeing these makes me want to try a pair without the shoulder straps and to try this pattern!
ReplyDeleteWhat I would like to add to your instructions...in the 18th Century and on back to the 15th little brass wire rings have been found on existent stays .... a small brass circle is sewn on the inside of the stay around the punched hole ... and then you sew with the heavier waxed linen thread over it as you are making the eyelet. keeps the hole round and from tearing out.
ReplyDeleteI have made dozens of the stays..16th, 17th and 18th C ...the eyelets always hold up with the addition of these rings. I use drapery brass wire rings... have to order from a drapery supply house IF my local custom drape maker is out of them.
Be sure to lightly wax reeds if you use them...they do not aborb water( sweat) so much if you do that. : )
ReplyDeleteThank you so much for posting this! I have been hesitant to begin this project......now I have the courage :)
ReplyDelete