I've just completed my research about butterflies. I was going to put them together...but it was a lot of information on one post. So I've chopped them up. I will link to the Butterfly Research so you can see my inspiration and documentation. Let's begin!
Materials:
Needle nose pliers
Clipper/scissors
Size 11 seed beads/cut steel beads
Size .25mm wire
Lot's of patience
1. Gather resources
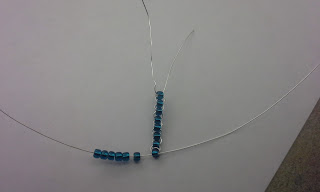
2. Loop first bead on about 8 inches of wire
3. Keep feeding wire through, adding beads
4. Add 8 beads total. Leave the top wire alone.
5. Push an 8 inch wire through the bottom bead. Add 6 beads on each side
6. Pull wires through the 3rd bead to create a loop and leftover wire on each side.
7. Add 15 beads to each wire and pull through 7th bead.
8. Loop leftover wire through 8th bead.
9. Use this same process of loop from each side to add beads to the center.
10. Get creative! Add different colors on the inside/outside to make it look more
realistic. Take care with the wire, as it is very thin and can break easily.
Be patient-I broke about 5 of these before I got it right!
While these are not exact replicas of surviving originals, they seemed to fit best in terms of durability and aesthetic. Plus, they were easier than most tutorials I found online! Based on my research, these can be stitched right onto the flowers of bonnets. Or attached to combs. I might add one of these to my shop when I'm feeling especially creative. As of now, I think my eyes and fingers need a rest! If you do end up making one and improving upon my design, please leave a comment so I can learn/be jealous.
~Kristen


nice blog. that’s truly good, keep up writing.
ReplyDelete2020 review for small needle nose pliers